Wednesday, November 18, 2009

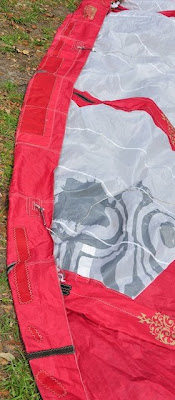
Cabrinha meets the rocks


Wow, so this one was epic for lack of a better word. Nothing complicated, but it just kept going and going. Our customer said that he was in heavy surf and the kite came down and was pushed against a rock wall. There were rips everywhere. We thought this looked quite good after the sewing. Our grey and orange repairs fit right in with the colors.

Monday, November 16, 2009

cabrinha kite repair | we have this weird color

So I bought this cloth wondering if we'd ever use it. Sure enough Cabrinha makes kites in this strange yellow.
cabrinha kite repair by windfire designs
Believe it or not, there was a rip down the middle of these three lines of stitching. This is the sort of alignment that we achieve on all our repairs.

Wainman Rabbit leading edge repair and shape test


This repair runs the full length of this wide shot. Here we are just shape testing it with a new bladder. The seam blew out from the H over to the next junction. We had to rebuild both edges over that length.

Tuesday, October 27, 2009

Fancy repair of an Ocean Rodeo Kite


As you can see from the sketch we made after we were done, this kite was messed up. I'm always amazed at how many simultaneous points of damage some kites come in with. This went back together really well though. The repairs are barely noticeable.

Thursday, October 22, 2009

Another powered paraglider repair


Recently we've been doing quite a few paraglider repairs. This one is a Dudek 27 meter. Apparently it was damaged because of the motor and prop. One cell needed to be completely rebuilt. All of our work was done internally so there was almost no change to the color of the wing.

Monday, June 29, 2009

Kite repair graphics

Nothing too exciting, but I thought this one looked nice.


On the front side you can see the graphics line up really nicely and are preserved very well.

Best HP - classic over inflation

This is a glimpse of the interior surface of the leading edge tube of a Best Waroo Pro HP. It has cuben fiber on the inside of the middle third of the leading edge. It's actually a great idea. The cuben is actually a pure spectra laminate that is simply amazing. I personally use it in many of our own kite designs. This is the main closure seam of the leading edge. It is perhaps the most important seam on the whole kite. It takes the most force and is often one of the first to fail. It's not because they are under-built. They are actually quite strong. It's just that the forces involved can be amazingly powerful, as any of you who have been lifted off the water know. This seam has signs that are classic of having been over-inflated. As you can see here the fibers have actually moved over and started to unweave. This was not evident until I opened the leading edge up. It looked like it was just a tiny section of the leading edge that was having problems, but it turned out that the seam was weak down a section about 2 feet long. Keep in mind, I think Best Waroo Pro HP stands for High Performance, not High Pressure. You still have to inflate these with care.


If you look closely in the above picture, you can see that there are fibers that are running diagonally. This is because the cuben fiber is made on a table, not on a loom. Thus they can get away with running fibers at any angle, not just 90 degrees. You can also see that the cuben fiber doesn't quite reach out all the way into the seam far enough to be structural. This I think is why this section failed.

Sunday, May 17, 2009

A break from repairing kites


Every now and then we get to actually go to the beach and fly kites still. To get away from the sewing machines is a nice thing and reminds us why we got into this kite flying thing to begin with. This is a foil that I designed back in 2000, wow, can't believe that it's almost 2010. Anyway, Paul has been wanting his own foil for quite some time now. He finally built it, and this is the first, and very impressive flight.

Thursday, May 7, 2009

Woah there - Settle down


Got this here today. We extensively repaired other areas but almost sent this out until we saw this great example of getting too excited when you are sewing. There's nothing wrong with doing this on a test piece of cloth while also staring out the window at whatever happens to be out there. And don't get me wrong, we are practiced at diplomacy, but every now and again we get the very accute urge to say woah there, put down the crack pipe and step away from the sewing machine. Anyway, after the small task of removing all the stitching, we just replaced this. Below is what it looked like after we redid it.

Tuesday, May 5, 2009

Truck Bike | The environment and our kite repair service

kite repairsrepaired kites on the truck bike
With the weather getting better and better for kiteboarding, we are in our busy season for our kite repair service. Here I am riding repaired kites in boxes from two days of Paul and me working around the clock. Some of these boxes have two or three kites in them too. I love this bike, it's a Worksman Frontloader Trycycle made in New York. I use it all the time to move repaired kites up to where I ship them at the end of each sewing day.

Thanks to all our great customers for making us so busy. We are trying to keep up with you, and trying to use less fuel to do so.

Tim

p.s. yes I know the tires are low on air, man this is such a pet peeve of mine that I almost photoshopped it.

Saturday, April 18, 2009

F-One leading edge Repair

This nicely made F-One hit some rocks and tore up the leading edge very badly. We forgot to take before images, but as you might be able to see, our repair goes from the center of the kite's leading edge all the way out to the tip. Paul, who did this one, said it was the longest he'd had to open and close a leading edge on a single kite in a long time, probably about 12 feet. F-One likes to double stitch their leading edges closed too, and this makes them nicely strong, but also makes them more difficult to open.
F-One Kite Repair leading edge
If you study the image, you can see our slightly darker red patches, but around those, you can also see the interior reinforcements. Paul staggered the edges of the inner and the outer patches to step down the increase in thickness which prevents a hinge from forming at the margin of our patches. Theoretically this should increase the life of the patch by preventing the material from always bending at the edge of our stitching.

The strut was also ripped. Below you can see the rather complex area that F-One makes around their struts. They at least are smart about it, unlike the slingshot splitstrut system that is impossible to open the struts for service, these are at least made with seams that can be removed from the exterior of the strut.

Wednesday, April 15, 2009

Another fishbird back on the water


I was just happy with this Best HP Waroo that I repaired today. Better blog about it.

Tuesday, April 14, 2009

Paraglider Repair - keep track of the dribs!


This nice looking wing is a Mac Para Eden 3 Paraglider. This one was sent to us by a long-time kite repair customer of ours, Brian Haupt. Thanks Brian. The cells had pesky damage on the lower skin that also effected the bridle attachment point. This first shot shows some of the damage and the disassembly that was necessary to properly repair this area. In my opinion, this wing is very nicely made. The blue tape in this shot is my way of keeping every stitch hole lined up on the dribs, the bridle point, and the rib they attach to while the skins are being healed up and repaired.

Below you can see the spread of the damage over several cells. It seemed that the wing smeared across a blunt object to cause these small and distributed lacerations.


I also noticed that there are two thread gauges used to make this wing. Of course they were easy to match, but it was interesting to see where the factory decided to use each gauge. Smaller gauge thread seems to lay a bit smoother in the final seam and it also makes your bobbins last longer between refills. Larger gauge thread doesn't always mean the stitch is stronger. If you sew onto an area that can keep up with the strength of the larger thread then it might be a good choice. But on thin cloth, large thread displaces the fibers of the cloth more drastically with larger holes and thus makes it weaker. This factory was smart, as you have to be when a life hangs from your wing.

I have done a lot of work with ram-air foils. I have designed and built them, three sizes in total. I have also taken one of my favorite buggy kites [the quadrifoil competition C2] completely apart, stitch by stitch, to see what made it tick. Recently we've been repairing paragliders here. They are very complex wings internally. Not only do they have dribs, but they are also tediously built with small details all over that are not to be taken for granted. I always imagine the people sewing them from scratch. Like anything that is sewn, if you look closely you can see the human behind the machine. Paragliders are reasonably easy to work on, as long as you pay absolute attention to detail. These wings are a product of many many design decisions and there are no accidents in the way they are built.

Wednesday, April 1, 2009

Heavily damaged Naish repaired

This kite was sent to us by one of our supporting shops, Jupiter Kiteboarding in Florida here. I was flattered that they didn't even call ahead to see if this kite was fixable, even as extensive as it was. I guess that after years of them sending us seriously damaged kites they just assume we can fix it no matter what.
naish repair
Above, you can see that there are two struts that are completely separated from the canopy, and that the canopy is ripped all the way up one strut, across the leading edge and over to the next strut, and half way down. Below you can see that we have put the canopy back together as the first step, but this is prior to adding the patch cloth. The two white lines are the factory reinforcement for the strut-to-canopy seam.

With the struts already separated from the canopy by the accident, it was slightly easier for us to put the sail back together. We also had to sew the trailing edge reinforcement line back in to the hem which had ripped out all the way across the kite. This can be tricky because as the needle of the sewing machine pierces the line the braid of the line is spread apart - this shortens the overall length.

Finally, with the struts sewn back in place, the kite is checked for shape. Actually, we did this just for the photo. We knew the shape was perfect because we saw every fiber line up as we repaired it.

The final shape check shows that this once-shredded kite is now repaired and back in perfect flying condition.

Thursday, March 12, 2009

Leading edge repair | air pressure and adhesive


Notice the curved path that the fibers take around the gash in this Cabrinha leading edge. This rip was not spread open when this patch was first laid down. Even though there was adhesive patch cloth on both the inside and the outside, the persistence of air pressure without sewing continues to work on the weakness—creeping the adhesive little by little. Eventually it will fail dramatically losing the bladder in the process. Below is a shot after we redid this repair. Internally there are two layers which you can see have a larger perimeter than the external cosmetic layer.

Kitefix system - do folks actually like this stuff?


Hey I get that this functions, I mean in the sense that your kite doesn't continue to fail and it holds the cloth together. But I am having trouble liking the stuff both visually and structurally myself. Kitefix seems to work by approximating the edges of your ripped kite fabric from one side, and then laying the fibrous gauze on the other side, and then slathering a gloppy permanent urethane adhesive from a tube over the entire area. Some added bonuses also seem to be that it will never ever come off even if you would like it to at some point in the future.

The adhesive is so intense that it works its way into the porosity of the fabric and manages to gather sand on the opposite side. Granted, this example was not well done to begin with, but all of this kitefix stuff that i've seen basically looks like this. I think it's just repurposed materials you can get from a hardware store to fix your basement. One of its least attractive features is that it becomes incredibly stiff. It's still foldable and flexible, but stiff in the sense that it does not stretch properly with your kite in the normal stress of flight. It feels unnaturally hard and out of place. Thus when the kite is loaded, it stands out in the kite's shape as an area that didn't get the memo.