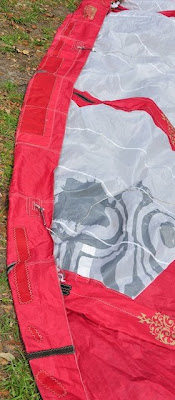
This nicely made F-One hit some rocks and tore up the leading edge very badly. We forgot to take before images, but as you might be able to see, our repair goes from the center of the kite's leading edge all the way out to the tip. Paul, who did this one, said it was the longest he'd had to open and close a leading edge on a single kite in a long time, probably about 12 feet. F-One likes to double stitch their leading edges closed too, and this makes them nicely strong, but also makes them more difficult to open.
If you study the image, you can see our slightly darker red patches, but around those, you can also see the interior reinforcements. Paul staggered the edges of the inner and the outer patches to step down the increase in thickness which prevents a hinge from forming at the margin of our patches. Theoretically this should increase the life of the patch by preventing the material from always bending at the edge of our stitching.
The strut was also ripped. Below you can see the rather complex area that F-One makes around their struts. They at least are smart about it, unlike the slingshot splitstrut system that is impossible to open the struts for service, these are at least made with seams that can be removed from the exterior of the strut.
Saturday, April 18, 2009
Wednesday, April 15, 2009
Tuesday, April 14, 2009
Paraglider Repair - keep track of the dribs!
This nice looking wing is a Mac Para Eden 3 Paraglider. This one was sent to us by a long-time kite repair customer of ours, Brian Haupt. Thanks Brian. The cells had pesky damage on the lower skin that also effected the bridle attachment point. This first shot shows some of the damage and the disassembly that was necessary to properly repair this area. In my opinion, this wing is very nicely made. The blue tape in this shot is my way of keeping every stitch hole lined up on the dribs, the bridle point, and the rib they attach to while the skins are being healed up and repaired.
Below you can see the spread of the damage over several cells. It seemed that the wing smeared across a blunt object to cause these small and distributed lacerations.
I also noticed that there are two thread gauges used to make this wing. Of course they were easy to match, but it was interesting to see where the factory decided to use each gauge. Smaller gauge thread seems to lay a bit smoother in the final seam and it also makes your bobbins last longer between refills. Larger gauge thread doesn't always mean the stitch is stronger. If you sew onto an area that can keep up with the strength of the larger thread then it might be a good choice. But on thin cloth, large thread displaces the fibers of the cloth more drastically with larger holes and thus makes it weaker. This factory was smart, as you have to be when a life hangs from your wing.
I have done a lot of work with ram-air foils. I have designed and built them, three sizes in total. I have also taken one of my favorite buggy kites [the quadrifoil competition C2] completely apart, stitch by stitch, to see what made it tick. Recently we've been repairing paragliders here. They are very complex wings internally. Not only do they have dribs, but they are also tediously built with small details all over that are not to be taken for granted. I always imagine the people sewing them from scratch. Like anything that is sewn, if you look closely you can see the human behind the machine. Paragliders are reasonably easy to work on, as long as you pay absolute attention to detail. These wings are a product of many many design decisions and there are no accidents in the way they are built.
Wednesday, April 1, 2009
Heavily damaged Naish repaired
This kite was sent to us by one of our supporting shops, Jupiter Kiteboarding in Florida here. I was flattered that they didn't even call ahead to see if this kite was fixable, even as extensive as it was. I guess that after years of them sending us seriously damaged kites they just assume we can fix it no matter what.
Above, you can see that there are two struts that are completely separated from the canopy, and that the canopy is ripped all the way up one strut, across the leading edge and over to the next strut, and half way down. Below you can see that we have put the canopy back together as the first step, but this is prior to adding the patch cloth. The two white lines are the factory reinforcement for the strut-to-canopy seam.
With the struts already separated from the canopy by the accident, it was slightly easier for us to put the sail back together. We also had to sew the trailing edge reinforcement line back in to the hem which had ripped out all the way across the kite. This can be tricky because as the needle of the sewing machine pierces the line the braid of the line is spread apart - this shortens the overall length.
Finally, with the struts sewn back in place, the kite is checked for shape. Actually, we did this just for the photo. We knew the shape was perfect because we saw every fiber line up as we repaired it.
The final shape check shows that this once-shredded kite is now repaired and back in perfect flying condition.
Subscribe to:
Posts (Atom)